Wednesday, April 24, 2019

SSIS - Set variable in SQL task with Single Row and Full result set

In my recent blog SSIS - How To Pass input parameter in Execute SQL Task explained how to pass input parameter in SQL task and this blog we will discuss about to set variable value in SQL task so that in later flow, we can use this variable value and we will also discuss how to map the list of returns value to variables

Here is a SQL Task – Get Project Code based on input project ID parameter.

SSIS SQL Task


SSIS SQL Task Editor


As we see, this SQL task takes ProjectID as input parameter and it always returns single project record.

SSIS_SQL_Task_Variable_InputParameter_Mapping


If result set = “Single Row”, we can maps the result set value to variables like ‘ProjectCode and ProjectName’

SSSI_SQL_Task_Single_Row_ResultSet

These variable we can use in further data flow (load project history data based on project code)

Here is OLD DB Source , we can see its pulling history records based project code

SSIS_OLEDB_SQL_Command_Paramter

And ProjectCode value is being set by input parameter variable

SSIS_Set_Query_Parameter

SSIS - How To Pass input parameter in Execute SQL Task

This blog will explain how to create a variable and how to pass it as input parameter in Execute SQL Task

Create Variable in SSIS Package.

We have a SQL task and this task will update project schedule date based on input date

SSIS SQL Task 

SQL Query:

Update Project SET ScheduleDate = ?

or

sp_updateScheduleDate ?

In above SQL query, we need to pass input parameter for schedule date, for this first we need to create a variable

1.    Open the Execute SQL task Editor -

Right Click on SQL Task à Select Edit à Open the Execute SQL task Editor


SSIS SQL Task Editor


SSIS SQL Task Editor


2.    Select Parameter Mappings

SSIS SQL Task Editor Parameter Mapping


3.    Click on Add button and Add Variable popup window will be opened and enter below fields


SSIS SQL Task Add Variable


·         Container   -  Specify Scope of variable, by default SSIS package name – eg Update
·         Name - Enter variable Name eg – ScheduleDate.
·         Namespace – Enter Namespace
·         Value Type – Select Data Type for variable (eg DateTime) 

SSIS SQL Task Add Variable Value Type

·         Value (by default value) – Today Date – 12/12/2019


After entered above fields and click on OK button


Maps variable as input parameter in SQL Task:

Maps the created variable ScheduleDate (User::ScheduleDate) as input parameter for SQL task and in SQL script, we have only one input parameter symbol ‘?’  So give parameter name as 0, and define parameter size 10 for Date Field

SSIS SQL Task Editor Parameter Mapping 

If you have more than one input parameter, then give parameter name as 0, 1, and 2.

SQL Query:

Update Project SET ScheduleDate = ?, ProjectName = ?

SSIS SQL Task Editor Parameter Mapping


Monday, April 22, 2019

How to test ASP.NET WEB API or Rest API By Using SOAPUI

SoapUI is built for end-to-end testing of Rest and SOAP APIs, Web Service and Micro Service.  SoapUI can easily automated API testing and perform load testing.

Here is an example:


Required Header: X-API-UserName, X-API-Token :

In above API, we need to pass Order ID as part of API‘s Path and for API security verification, we have to pass user Name and API token as HTTP Request Header.

To test above API, we need to follow the below steps:

·         Install SOAPUI Tool

·         Run the SoapUI APP and click on REST Icon

SOAP UI

·         Enter REST API URL -  https://localhost:/Order/ID/1000

SOAPUI - REST API URL


·         Click on header tabs and enters Header Name and Value ( in example, X-API-Token Header)  

SOAP UI - ADD HEADER
         

·         Click on OK

SOAP UI -  HEADER

·         Click on Run Button () to submit HTTP Request for API

SOAPUI - Submit HTTP REQUEST


Thursday, April 18, 2019

JavaScript Equal Operator == vs ===

Javascript has two equality comparison operator - double equals “==” and triple equals “===”.  Both are used to compare equality of two values and most of time both operator returns same result, until both value are not same data type.

Let us first discuss double equals “==” aka loose equality, in loose equality, first it converts into command type and then it compares equality. 
Example : 

var a = 10,
var b = 10
a == b 
// true

Javascript equality table

   Source : https://dorey.github.io/JavaScript-Equality-Table/

Triple equal “===” aka strictly equality, in strict equality, it does not perform any data type conversion, if both values are not same type, it returns false value. 
Example :

var a = 10,
var b = 10
a=== b 
// false

Javascript equality table

Source : https://dorey.github.io/JavaScript-Equality-Table/

In both example, double equal “==”, it first converts the string ‘10’ and number 10 in same common type and then it compares, so it returns True. But in triple equal “===”, it founds both value are different type and it simply returns False

Sunday, April 14, 2019

Web Performance and Load Testing of Rest API(ASP.NET Web API) by using Visual Studio Tool

This blog explain how to create Web Performance and Load testing Project in visual studio and it explains steps by steps how to perform load and web performance testing of ASP.NET WEB API or Rest API. We will discuss about the different pattern of load testing like constant and step load pattern 

In the Enterprise edition of Visual Studio, Web performance and load test projects are available and  you can install the load testing component

Steps to create Web Request:

1.       Create Web Performance and Load Test Project
·         Open the visual studio and choose Create a new project
·         select the Web Performance and Load Test Project


               Web Performance and Load Test Project:


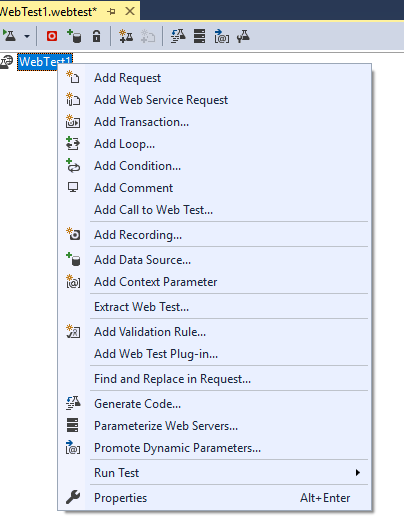
2.       Create Web API request : Select WebTest1.Webtest and click on Add Request options         


Provides the API URL  

                                            
·         Add Header, if required
·         Add Query String, if required
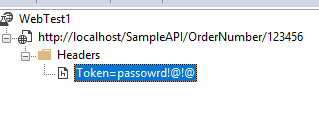
In current request, Token Header is added


Steps to create load test:

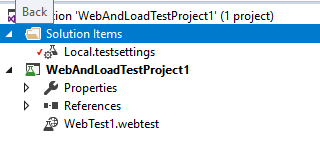
1.       Right click on project node and choose the Add à Load test
2.       “New Load Test Wizard” Options


            There are two options
1.       Cloud-based Load test
2.       On –premises Load Test

         If you want to run in local network and on local system, choose the On-premises load test and click on Next, ‘Run Setting’ screen will be appeared

3.       Run Settings        


In Load run setting, you can provide the total load test duration time along with warm-up duration time
                Load test duration
                                Run duration: 10 mins
                                Warm –up duration: 30 secs

Click on Next, scenario screen will be appeared

4.       Load Test scenario


You can give load test scenario name – ConstantLoad and click on Next button, Load Pattern screen will be appeared.

5.       Load Pattern


There are two type of load patterns
·         Constant Load
·         Steps Load

In constant loan, the same loaded will be applied for all testing duration and load will not be changed.
In steps pattern, the load will be gradually increased after given step duration

We choose constant load and entered 10 user count for load testing and click on Next button, the test Mix Model screen will be appeared.

6.       Test Mix Model:


There are following models for test mix

·         Based on the total number of tests
·         Based on the number of virtual users
·         Based on user pace
·         Based on sequential test order

For this load testing, I choose the based on the number of virtual users option and click on Next button, The Tax Mix Screen will be appeared.

7.       Test Mix


You can add tests to a load test scenario

Click on Add button à Add Tests popup window will be opened and you can select test from Available tests list and click on OK button.


You can distribute load (in %) among all selected tests and if you want to manually adjust the distribution, simply enter value under % column or use scroll-bar
under distribution column .


If you want to load should be equally distributes among all tests, click on Distribute button

Click on Next button, the Network Mix will be appeared.

8.       Network Mix


In Network Mix, you can add one or more network types for load testing and also you can distribute among them (simply enter value or use scroll-bar)
Click on Next button, the browser mix screen will be appeared.

9.       browser mix


In browser mix, you can add one or more browser for load testing and also you can distribute load among them (in above pic) I have selected two browser
Chrome and Firefox for load testing and load are equally distributed.

Click on Next button, the Counter Set wizard will be opened.


And click on Finish Button, the Load Test is created and simple open the Load test in Load Test Editor


Right click on root node (LoadTest2) and Select Run Load Test.


SQL Server - Identify unused indexes

 In this blog, we learn about the index usage information (SYS.DM_DB_INDEX_USAGE_STATS) and analyze the index usage data (USER_SEEKS, USER_S...