Showing posts with label C#. Show all posts

Friday, February 7, 2020

Entity Framework: How to update stored procedure in EDMX

An .edmx file is an XML file that defines an Entity Data Model (EDM), describes the target database schema, and defines the mapping between the EDM and the database.

Update imported stored procedure /view in EDMX:

1.       Open the .edmx file and right click on EDMX and select Model Browser


2.       In Model Browser, the Functions Imports under OfficeModel tab and select stored procedure ‘GetOfficeHistoryByID’ and Click on Edit


3.       “Edit Function Import” window will be opened and Click on “Get Column Information” button to get stored procedure the output schema.


4.       Click on Update Button under “Returns a Collection of” Section to update complex type “GetOfficeHistoryByID_Result”, which will be used to map the stored procedure output data.


5.       Save .edmx file to reflect field changes related to stored procedure /view.


Friday, January 17, 2020

C# : How to use Parallel.Invoke to execute the parallel operations


In nowadays we have multiple core CPU machine that enables to process the multiple thread on same time/simultaneously. .NET framework provides class library and runtime support to write efficient the parallel programming code. For more information about the parallel programming architecture please visit Parallel Programming in .NET.


In this article, we will discuss about the Parallel.Invoke method and how to write the parallel programming code with help of this.


Parallel.Invoke Parallel Programming


Parallel.Invoke method provides a simple way in which a number of Tasks may be created and executed in parallel and we don’t need to create a complicated threading code.

Here is syntax:

public static void Invoke(params Action[] actions);

Parallel.Invoke takes as array of delegates of method and it execute each of provided methods in parallel.

public static void Invoke(System.Threading.Tasks.ParallelOptions parallelOptions, params Action[] actions);

In second method, we have more control over execution of parallel operations. With help of additional parameter parallelOptions, we can control the max degrees of parallelism means the maximum number of concurrent tasks and we can also cancel the operation by using CancellationToken property.

Here is a simple example of Parallel.Invoke method:

static void Main()
        {
            List requests = GetRequests();

            ParallelOptions parallelOptions = new ParallelOptions();
            parallelOptions.MaxDegreeOfParallelism = 10;

            foreach (Request request in requests)
            {
                Parallel.Invoke(parallelOptions, async() => await ProcessRequest(request));
            }
           
        }

static async Task ProcessRequest(Request request)
        {
            // Process Request and produce response asynchronously
        }

In above example, we are controlling execution of parallel operations and only 10 max concurrent tasks are allowed.


Monday, December 30, 2019

C# Regular Expression - Starting and Ending words

In C # programming, regular expression is used to validate user input and to validate the starting of words, we use caret (^) and for ending words, we use dollar ($).

In C#, The Regex class is used to verify the specific character pattern and it offers several methods and properties to parse input string and verify the specific patterns.

Match the beginning of the string:
Caret (^) is used to matches the beginning of the string

     string regExPattern = "^t";

            Regex regex = new Regex(regExPattern);
            Console.WriteLine(regex.IsMatch("tom"));
            // true

            Console.WriteLine(regex.IsMatch("dom"));
            // false

            Console.WriteLine(regex.IsMatch("jon"));
            // false

Match the ending of the string:
Dollar ($) is used to matches the ending of the string

      string regExPattern = @".com$";

            Regex regex = new Regex(regExPattern);
            Console.WriteLine(regex.IsMatch("tom@mail.com"));
            // true

            Console.WriteLine(regex.IsMatch("dom"));
            // false

            Console.WriteLine(regex.IsMatch("jom@mail.com"));
            // true


Tuesday, October 15, 2019

XML Serialization - how to add namespace as prefix to XML Element or XML Attribute

XML Serialization Process converts .net object into XML format and by default object property or class name becomes XMLElement or root element until there is explicitly set ElementName or AttributeName property for XMLElement or XMLAttribute.
Here is an example without element Name or attribure Name

  public class Order
    {
        public int OrderNumber { get; set; }

        public string Item { get; set; }

        public string User { get; set; }

        [XmlAttribute]
        public string version { get; set; }
    }


XML String:

XML Serialization XML String

Now let specify element name and attribute name for each XML Element and XML Attribute tags

    public class Order
    {
        [XmlElement(ElementName = "OrderNum")]
        public int OrderNumber { get; set; }

        [XmlElement(ElementName = "ItemDetails")]
        public string Item { get; set; }

        [XmlElement(ElementName = "UserInfor")]
        public string User { get; set; }

        [XmlAttribute(AttributeName="OrderVersion")]
        public string version { get; set; }
    }

XML String:


XML Serialization XML String with XMLElement

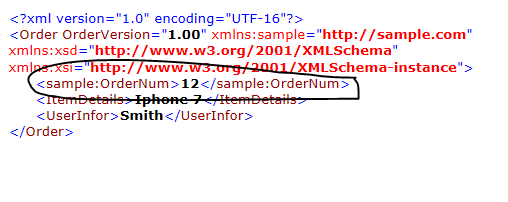
Add Namespace as Prefix to XML element or attribute:

We will learn how to add namespace as prefix to XML element or attribute

·         First, we need to define XmlSerializerNamespaces class object, which hold reference of namespace and its prefix.
·         Second, we need to specify of namespace of XMLElement ot XMLAttrbute, which we want to set namespace as prefix for their name


public class Order
    {
        [XmlElement(ElementName = "OrderNum", Namespace= "http://sample.com")]
        public int OrderNumber { get; set; }

        [XmlElement(ElementName = "ItemDetails")]
        public string Item { get; set; }

        [XmlElement(ElementName = "UserInfor")]
        public string User { get; set; }

        [XmlAttribute(AttributeName = "OrderVersion")]
        public string version { get; set; }

        [XmlNamespaceDeclarations]
        public XmlSerializerNamespaces xmlns = new XmlSerializerNamespaces();

        public Order()
        {
            xmlns.Add("sample", "http://sample.com");        
        }     
    }


XML String:

XML Serialization XMLElement Name with namespace

Now you can see in above XML string, it has <sample:OrderNum>12</sample:OrderNum>  xml element tag with namespace as prefix in place of <OrderNum>12</OrderNum>

Same thing we can apply for XMLAttribute xml tag also, we can set attribute name with namespace as prefix

Here is an example for XMLAttribute tag, having namespace as prefix for attribute name


public class Order
    {
        [XmlElement(ElementName = "OrderNum", Namespace= "http://sample.com")]
        public int OrderNumber { get; set; }

        [XmlElement(ElementName = "ItemDetails")]
        public string Item { get; set; }

        [XmlElement(ElementName = "UserInfor")]
        public string User { get; set; }

        [XmlAttribute(AttributeName = "OrderVersion", Namespace = "http://sample.com")]
        public string version { get; set; }

        [XmlNamespaceDeclarations]
        public XmlSerializerNamespaces xmlns = new XmlSerializerNamespaces();

        public Order()
        {
            xmlns.Add("sample", "http://sample.com");        
        }     
    }


XML String:

XML Serialization XMLAttribute Name with namespace

Now you can see in above XML string, it has sample:OrderVersion xml attribute tag with namespace as prefix  in place of OrderVersion


Other related posts:

Friday, October 11, 2019

XML Serialization: How to serialize a property as XML attribute in serialization

.NET framework provides a set of attributes class (for example, XMLElement, XMLAttribute etcs) which controls the XML serialization from .net object to XML.
 XMLAttribute is used to include a property of object as attribute in XML and you can also provide own the attribute name, which is different from property name.

Here is an example in C# to serialize a property as XML attribute.

   public class Order
    {
        public int OrderNumber { get; set; }
        public string Item { get; set; }
        public string User { get; set; }

        [XmlAttribute(AttributeName="OrderVersion")]
        public string version { get; set; }
    }

In above Order Class, version property is being decorated with XMLAttribute, this field will be serialized as XMLAttrbute “OrderVersion” of parent XML Element “Order”

Order order = new Order { Item = "Iphone 7",  OrderNumber = 12, User = "Smith", version = "1.00" };

Here is serialized XML string corresponding from  above Order instance


XML Serialization - XMLAttribute


Other related posts:

XML Serialization: How to serialize an object to xml in C#


Serialization is the process of converting an object into a format (for example stream of bytes) that can be stored (for example in database, in a file) or transmitted over network. The reverse process is called De-serialization.

How to serialize an object to xml in C#

There are various data Serialization formats to convert object into serializable formats (for example bytes, XML, JSON)


 1.   XML serialization:
XML serialization serializes the public fields and properties of an object, or the parameters and return values of methods, into an XML stream that conforms to a specific XML Schema definition language (XSD) document

2.   Binary serialization :
Binary serialization uses binary encoding to produce compact serialization for uses such as storage or socket-based network streams.

3.   JSON serialization :
JSON serialization is used to serialize objects into JSON-encoded data, which is very efficient to transfer the small amount of data between server and client browser 


In this blog, we will discuss about the XML Serialization and how to convert C # object into XML format.

Microsoft provide the XmlSerializer class to serialize the .net Type into XML format and XmlTextWriter to output the XML string.

Here is a C# example of XML serialization

  public class Serializer
    {
        public string ToXML<T>(T Object)
        {
            StringWriter  stringWriter = new StringWriter();
            XmlTextWriter xmlTextWriter = null;

            XmlSerializer serializer = new XmlSerializer(Object.GetType());
            xmlTextWriter = new XmlTextWriter(stringWriter);
            serializer.Serialize(xmlTextWriter, Object);

            return stringWriter.ToString();
        }
    }


Now let’s create a .net object ‘Order’ for XML serialization   

   public class Order
    {
        public int OrderNumber { get; set; }
        public string Item { get; set; }
        public string User { get; set; }
    }

Create an instance of Order Class and try to convert order object into XML

     Order order = new Order {
Item = "Iphone 7",
 OrderNumber = 12,
 User = "Smith"
};

     Serializer serializer = new Serializer();
     string xml = serializer.ToXML<Order>(order);

When run the above code, you will get below XML string from Order instance.


Other related posts:

SQL Server - Identify unused indexes

 In this blog, we learn about the index usage information (SYS.DM_DB_INDEX_USAGE_STATS) and analyze the index usage data (USER_SEEKS, USER_S...